Hello
and happy Saturday/World Cardmaking Day my crafty friends! Today we have a fabulous new
release for you from RachelVassDesigns called Fig and Pumpkin Wreath and
it is perfect for this time of year, when everyone is decorating their
homes for Autumn and Thanksgiving if you are from Canada or the US.
This would be the perfect centrepiece to any decor or dinner table! I
made 2 different cards for this release and one of them has 2 slightly different versions. Let's get to it!
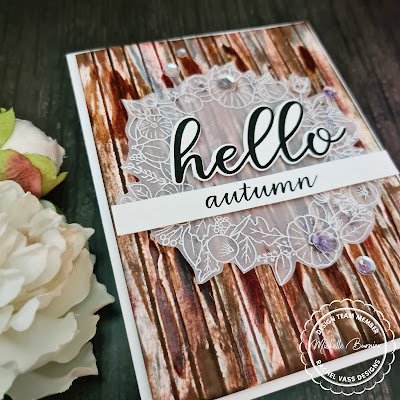
For
my first card I wanted the wreath to appear as though it was hanging on a
beautiful old wooden front door or even on a barn door. Although
I do have lots of wood background papers, a woodgrain stamp and several
woodgrain embossing folders, none of them would have given me the look I
was envisioning for my project, so I did what any other person would do
of course...I turned to Pinterest to look for some tutorials to make my
own background. I tried 2 different tutorials.....the second one ended
up a bust, but luckily this one turned out good!
I
started out with a piece of white cardstock and some regular old arts
and crafts white glue (Elmers would be perfect as well, but I used what
was available to me here). I started by adding vertical lines of glue
going on the paper and not paying any attention if some globs of glue
came out. I then took a small paintbrush and just brushed the lines
very lightly, as I didn't want to completely flatten the lines. I then
set that aside to completely dry. While that was drying I printed
out
the wreath on some heavy weight vellum twice. I then heat embossed it
once with gold fine detail embossing powder and the second time using
some white fine detail embossing powder and then fussy cut them both
out. I enlarged and printed out the lone hello and then the
"hello autumn" a bit smaller from the same set and cut them out.
Once the glue was dry on my cardstock, I turned them to the reverse side and
scored them at 1/4" intervals in the same direction as the lines of glue. I then grabbed 5 different colours of
Distress Ink and started to do direct ink to paper again going in the same
direction as the scored lines and glue. I first started with the
lightest ink and gradually went darker (all inks and supplies are listed below).
I trimmed down my "wooden" piece to 4"x5.25" and added it to my cardbase
using some craft foam. I added some glue to the vellum wreath under the
2 sentiment pieces and just a few more small little bits of glue here
and there (you can see a bit of it on the white wreath though) and
popped the sentiment up using foam adhesive squares. All they needed to
finish them off was a few sequins and done!
I trimmed down my "wooden" piece to 4"x5.25" and added it to my cardbase
using some craft foam. I added some glue to the vellum piece under the
2 sentiment pieces and just a few more small little bits of glue here
and there (you can see a bit of it on the white wreath though) and
popped the sentiment up using foam adhesive squares. All it needed to
finish them off was a few sequins and they are done!
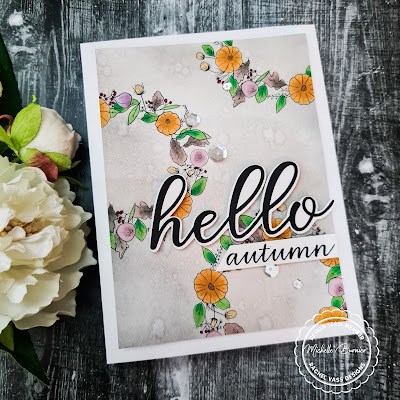
For my second card I wanted it to have a softer and more feminine feel than the other. To start I arranged 3 of the wreaths on the page using my Silhouette Studio software program and printed it out. I then proceeded to colour them in using my Copic markers. To soften the stark white of the paper against the coloured wreaths, I did some ink blending over the piece using a light grey Distress Ink.
I then added some water drops using my Distress Sprayer and left them for a few seconds and then dabbed them off using a paper towel. I trimmed down the piece to 3.75"x5" and added it to a piece of white craft foam and then adhered it to my white card base. All it needed to finish it off was a few of my fave clear sparkling sequins. I love how soft and pretty this one came out and that large hello diecut is fab too!
I absolutely love how they both turned out! They show how versatile digital images are and how you can get completely different looks from the same image! I really hope you give them a try and see for yourself just how much fun and how creative you can get with them! Which card is your favourite? I'd love to hear down in the comments.Head on over to Rachel's Etsy shop and grabbed yourself this fabulous new digi release....can't think of a better time to get creative and make some amazing cards than on World Cardmaking Day!
Thank you so very much for stopping by today and spending a bit of your day with me. It really means alot to me. Don't forget to subscribe so you don't miss out on any future posts!
Thank you again and until next time,
Michelle 🙏
- RachelVassDesigns Fig and Pumpkin Wreath digital stamp set
- UHU Arts & Crafts Glue
- Paintbrush
- Tim Holtz/Ranger Distress Inks - Gathered Twigs, Weathered Wood, Aged Mahogany, Vintage Photo, Tea Dye and Hickory Smoke
- Stampendous Fine Detail White embossing powder
- Ranger Fine Detail Gold Embossing powder
- Stampin' Up Heat Embossing Tool
- Copic markers - E70, 71, 74, Y32, YR21, 23, 24, YG11, 13, 17, G16, 19, V15, 20, RV91, 94 and R59
- Bazill Heavy Weight Vellum
- Taylored Expressions Blending Brush
- Neenah Classic Crest Solar White 80lb cardstock
- misc. white cardbase
- Canon laser printer
- Silhouette Studio program
- Craft foam
- Pretty Pink Posh Clear Sparkling sequins
- misc. gold sequins


.png)

Be First to Post Comment !
Post a Comment