MADE BY MICHI

Handmade with Love

28 February 2025

Crafty meraki 3 ways post

 Hey friends....it's Michelle back with you today with way #2 to use the Crimson Charm Press-Tacular Plate.  Last time I used it to create a beautiful embossed background full of texture.  This week I am using it to hotfoil with.  Let's get started, shall we!

So I had started my card for today in a slightly different direction.  I had initially hot foiled the pressplate onto a piece of the BetterPress cardstock using some Opal foil.  Opal foil is transparent with an iridescent finish to it.  My idea was to do some ink blending over it, zto bring out the iridescent foiled lines of the image.   Well it didn't quite foil properly as I had hoped and obviously the ink blending brought out the imperfections in it.  However, I didn't throw this out, but rather kept this piece of cardstock to use.  

I decided the foil the reverse image of the PressPlate with the foil from the above.  I have never had much luck with foiling the reverse images, but thought as this was a smaller image it may work out better for me.  So I heated up the solid hotfoil plate from PinkFresh Studio....I left it on the machine for maybe 5-10mins.  I added the reverse foil image and my cardstock and ran it through.  Above is before I removed the backing layer from the foil.  You can see the gorgeous iridescent finish to it!  I have no idea what the little black dots are from though...that I'll have to investigate lol.

I removed the protective backing from the foil and started doing some ink pad swiping with Distress Inks, directly to the foiled image, to bring out the floral image. As you can see I still didn't get a perfect foiled image, but I was happy with it.  That's the most success I've had with that plate yet lol.  I wiped off the excess ink from the foiled surface, as it will just it on it and won`t absorb into the slick foiled surface.  I then proceeded to cut out the image using the coordinating die.  I cut out a second blank image from some scrap paper for dimension.

I decided to use the original ink blended background, so I added some gold splatters to the ink blended area.  Allow this to dry and triim it down to 3.75x5".  Using the Bold & Beautiful stamp set, heat emboss the sentiment in gold to coordinate with the splatters and cut out.  

Once the gold splatters are dry, adhere the foiled image and the sentiment using liquid adhesive and foam adhesive.  Add a few of the Meraki Sparkle Golden Illusion Gems to finish it off.

It is so hard to capture this foil in a photo...the iridescence of it is beautiful!  Using the reverse foiled image is a great way to get double for your buck, if you will.  Instead of throwing out the piece of foil, try this if you have a solid hot foil plate, because who doesn't love a shiny foiled image!  

Be sure to come back next week for the last and 3rd way to use the Press-Tacular Plates.  Thank you so much for stopping by today at the blog.  I wish you all the most wonderful and creative day!  Until next time, Michelle :)

15 February 2025

WOW! Embossing Powder February 2025 New Release Hop and Giveaway


I’m thrilled to be joining WOW! Embossing Powder to celebrate their February 2025 Release—happening on Saturday, 15th February 2025! This is an epic release packed with an exciting range of new products, including the all-new 2025 Collection of Sparkles, the New & Improved Earth Sparkles Collection 2025, our signature Ultra High Collection, and a revolutionary line of NEW HOT Foils. In addition, you’ll find some fabulous singles, Duos, Trios, and Quads created by some of our very best Designers. You can find the entire new collection here.

The WOW! Design Team and our special guests have come together to showcase this inspiring launch, sharing creative ideas and innovative project concepts to help you craft your next masterpiece.

And guess what? WOW! is giving away THREE amazing prize bundles! Keep reading to find out how you can WIN a selection of our new release products (worth over $70!).

But first, let’s dive into the inspiration!


For this project I used one of the gorgeous new additions to the ultra high collection Primary Indigo for the main part of the flower.  This is a gorgeous rich indigo colour. I cut out the flower and did some ink smooshing with the Ultra Slow Drying Embossing Ink Pad, added the powder and then heat set it.  I repeated this process twice, as I wanted a super glossy almost enamel look to the flower.   But the really cool thing with this powder, is that the longer you hold your heat embossing tool on the powder, you can actually move it a bit and get a lighter almost lilac colour to it...that's the lighter purple colour you see at the top of the cupped flower.  I really liked the way it looked, so I left it peeking out there.   I added another one of the new powders, Ray of Sunshine to the middle of the flower for that bit of sparkle.  I put my flowers together, added them to my background and that was it!   Purple and gold go so well together and these powders are perfection together!  The light and airiness of Ray of Sunshine compliments the richness of the Indio so well.  Such regalness this is giving!  


For my second project I used another addition the ultra high collection, Pastel Spring Glow.  I did some embossing using a 3D embossing folder.  I then ran my ultra slow embossing ink pad over the embossed raised areas and added on my embossing powder.  Before heat setting the powder I took a small paintbrush and just removed and stray bits of powder that got in the areas I didn't want powder.  I heat the teh powder and then added some gold splatters.  I took the same gold paint and ran a paintbrush around the edges of it.  The sentiment was added and that was it.  I love the extra dimension the powder gives the already embossed image!  This powder is such a pretty green and it just screams Spring (well it is int he name after all lol).


🎁 Giveaway Details

We’re celebrating this epic release with a special giveaway across TWO platforms—giving you two chances to win a fabulous prize bundle!

WOW! is generously offering TWO prize bundles, each featuring a selection of our brand-new release products (worth over £50+). Here's how to enter:


✔️ For the Blog Hop:
 Leave a comment on your blog post by 6pm GMT on 19th February 2025.

✔️ For the Instagram Hop:
 Drop a comment on your Instagram post by 6pm GMT on 19th February 2025.


One lucky winner will be selected from each platform’s entries. Winners will be announced on 20th  February 2025 on the WOW! Embossing Powder Blog.

Want even more chances to win? Make sure you join both the Blog and Instagram Hops—each platform is a separate entry, and each comment on any of the stops is a separate entry!


🔗 Hop Details 

Thank you for stopping by! If you enjoyed this post, be sure to follow/subscribe so you never miss new crafty inspiration. 


You should have arrived here from Natasha Davis.

Next up, head over to Jayne Vaughan for more gorgeous inspiration! 


Want to start from the beginning? Check out the WOW! Embossing Powder Blog here.


28 July 2024

WOW! Embossing Powder July 2024 New Release Hop and Giveaway


I’m excited to be joining WOW Embossing Powder to celebrate their July 2024 release! It's a BUMPER release, filled with Embossing Sparkles, Fab Foils and even a completely NEW product line; Mixed Media Additives!

The Design Team and special Guests are each sharing inspiration using this gorgeous new release and you’re invited to join the party! 🥳


WOW are generously offering THREE lucky winners the ENTIRE July 2024 release, and you can get all of the details on how to enter further down this post. First, let’s get straight to the inspiration!


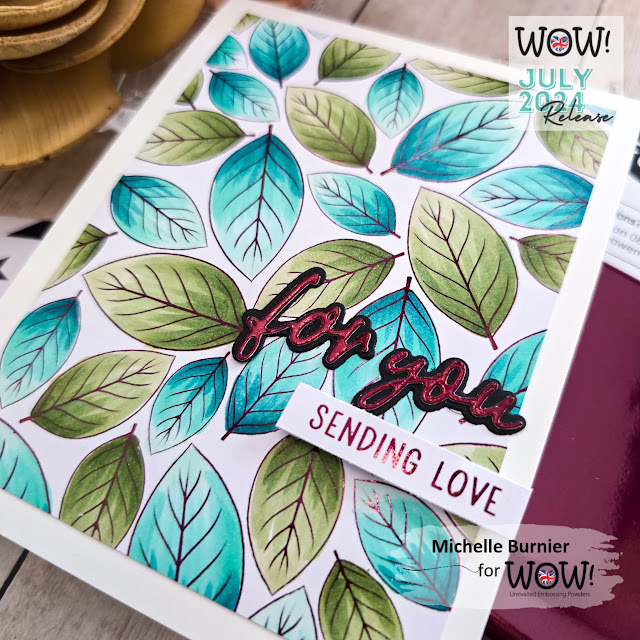
For my project today, I used one of the gorgeous new Fab Foils Deepest Darkest Crimson. This is a beautiful colour (it may be my new favourite foil!) and combined with the other 2 new foils, it gives so many ideas.....especially Autumn!


I decided to foil the leaf background from the
Fab Foilers Pattern Art (again giving me those Autumn leaves changing vibes) with the foil using my laminator. Once it was foiled I coloured the leaves using green and teal alcohol markers. I tried not to go too heavy over the foiled areas, as not to possibly disturb the foil and remove some of it. For the sentiment I foiled a small piece of the Fab Foilers Solid Panel, just big enough for my sentiment and for the smaller sub sentiment it was from the Fab Foilers Sweet Sentiments.

It was all adhered to my ivory A2 cardbase and the sentiments were adhered using liquid adhesive and foam tape. A black shadow layer was cut for the base of the sentiment as well.


Giveaway Info


We are so excited about this amazing new mixed media release, that we are hopping over 3 different platforms to give YOU the best chance to win!

WOW are generously offering THREE goodie bags that will contain the entire July 2024 release, worth over $70!


This post is part of the Blog Hop, so you just need to leave a comment on this post before 6pm BST on the 1st of August. You’ll find the link to the next awesome designer further down this post, or you can go straight to the WOW Embossing Powder Blog post to start from the beginning.

One lucky winner will be selected from the comments left across this hop, so the more posts you leave a comment on, the more chances you have to win!


Don’t forget to find us on Instagram and Youtube for even more chances to be a lucky winner!
(Further details are included on the WOW Embossing blog post.)


Thank you for checking out my post today, if you like what you see, then don’t forget to follow and/or subscribe so you don’t miss any of my content!


You should have got to me from Nicki Baxley

Next up in the hop is Quyen Rabet


The full lineup is at the bottom of this post, or head to WOW to start at the beginning!


Blog Hop Lineup


WOW Embossing 

Aditi Mahajan

Sarah Phelan

Rick Adkins

Larissa Heskett 

Nicki Baxley

Michelle Burnier 

Quyen Rabet

Jayne Vaughan

Rebecca Keppel

Amanda Fitterer

Natasha Davies


Supplies Used


30 June 2024

WOW! Embossing Powder June 2024 New Release Hop!


I’m excited to be joining WOW Embossing Powder & Seth Apter to celebrate their latest release of fabulous Mixed Media Embossing Powders! The Design Team and special Guests are each sharing inspiration using this gorgeous new release and you’re invited to join the party! 🥳

WOW! are generously offering THREE lucky winners the entire June 2024 release, and you can get all of the details on how to enter further down this post. First, let’s get straight to the inspiration!

WOW! has come out with 2 new gorgeous mixed media Quads - Building Blocks and Citrus. For my project I used the Citrus. These powders are full of gorgeous, fun and bright colour and texture! Although they are additions to the range of mixed media powders, I thought how amazing these colours would be in a CAS way. I wanted these powders to shine and take all the spotlight!

Create the background by diecutting a piece of smooth white cardstock using a patterned cover die, as this would add interest to the background without deterring away from the focal point....the powders. Next take 4 pieces of cardstock cut approximately 3/4" high (or as high as you need to fit your diecut) and as long as you'd need to fit your sentiment diecut...in my case they were cut to 4" long. Go direct to the cardstock strips with your embossing inkpad or vice versa (press your paper strips to your inkpad) and ensure you get a full coverage of ink on the paper. Sprinkle each embossing powder on 1 piece of cardstock each (you will have 4 different colours in the end) and heat emboss from underneath.

Adhere each embossed strip to a piece of thin copy paper, using double sided adhesive, starting with Rusty, Tomato,, Kiwi Gold and finishing with Olive. Diecut the shadow layer of the sentiment from these embossed strips and then the more intricate top layer of the sentiment from the same smooth white cardstock as used for the background.


Heat emboss in Opaque Bright White embossing powder the smaller sentiment on a piece of green cardstock that coordinates with the Olive embossing powder and then diecut the small square speech bubble. Adhere the 2 sentiments on the background using liquid adhesive for the large piece and foam adhesive for the smaller one. Add to an A2 cardbase.


For the embellishments diecut a small heart from the leftover Olive heat embossed cardstock strip. And did you know that you can actually make matching embellishments too...as in pearls??? I took 3 white flat back pearls in various sizes and adhered them to a piece of masking tape. Take the tape with the pearls and go direct to the embossing ink pad and do some ink smooshing (exactly the same technique as you do for the cardstock) and ensure that the pearls are fully covered with the ink. Leaving your pearls on the masking tape, sprinkle on the Rusty powder and make sure that they are completely covered. Again, leaving the pearls on the tape, heat set the powders using your heat embossing tool, heating from above but using the lower of the 2 speeds on the WOW! Heat Embossing Tool. Using the lower of the 2 speeds will help to cut back on any stray bits of powder that may fly away, since we are heating from above and this is a textured powder. Once heat set, remove the pearls and adhere to your background along wiht the small diecut heart.

Giveaway Info

We are so excited about this amazing new mixed media release, that we are hopping along over 3 different platforms to give YOU the best chance to win!

WOW are generously offering THREE goodie bags that will contain the entire June 2024 release.

This post is part of the Blog Hop, so you just need to leave a comment on this post before 6pm BST on the 3rd July. You’ll find the link to the next awesome designer further down this post, or you can go straight to the WOW Embossing Powder Blog post to start from the beginning.


One lucky winner will be selected from the comments left across this hop, so the more posts you leave a comment on, the more chances you have to win!

Don’t forget to find us on Instagram and Youtube for even more chances to be a lucky winner!

Further details are included on the WOW Embossing blog post.


Hop Details


Thank you for checking out my post today, if you like what you see then don’t forget to follow/subscribe/join my mailing list so you don’t miss any of my content!


You should have got to me from Lisa Bzibziak

Next up in the hop is Natasha Davies


The full lineup is at the bottom of this post, or head to WOW Embossing  to start at the beginning!


Supplies Used:


24 May 2024

WOW! Embossing Powder May 2024 New Release Hop


I’m excited to be joining WOW! Embossing Powder to celebrate their latest release of their new gorgeous Embossing Powders.......Speckled Pearls Trio, Candy Buffet Trio and A Night on the Town Duo! The Design Team and special Guests are each sharing inspiration using this fabulous new release and you’re all invited to join the party! 🥳

WOW are generously offering THREE lucky winners the entire May 2024 release, and you can get all of the details on how to enter further down this post. First, let’s get straight to the inspiration!


For my project I decided to use the Speckled Pearls Trio.  This is a beautiful trio of blues and green.... Speckled Egg, Speckled Turquoise and Speckled Sage and as the name suggests, they have a beautiful speckled pearl finish to them.  I decided to show them on both a white and a black cardstock base for my project, as they look very different depending on the base colour.  In my photos, although the Speckled Egg and Speckled Turquoise look quite similar, I can assure you however that they are very different in person. 


I used a quilted circle coverplate die, as it would be perfect for the trio!  I cut 2 circles of each of the  embossing powders on white and black cardstock and arranged them on my diecut background, 1 row of each powder.  I alternated the powders between dark and white cardstock, popping up every other circle using foam adhesive.

I diecut a simple happy from black cardstock, as I didn't want too much of the powders covered up and heat embossed the small sub-sentiment using Primary Ebony embossing powder. I added my diecut background to my A2  cardbase and the sentiments were adhered using both liquid and foam adhesives.  


We are so excited about this fabulous new release, that we are hopping along over 3 different platforms to give YOU the best chance to win!

WOW are generously offering THREE goodie bags that will contain the entire May 2024 release.


This post is part of the Blog Hop, so you just need to leave a comment on this post before 6pm BST on the 28th May. You’ll find the link to the next awesome designer further down this post, or you can go straight to the WOW Embossing Powder Blog post to start from the beginning.
One lucky winner will be selected from the comments left across this hop, so the more posts you leave a comment on, the more chances you will have to win!

Don’t forget to find us on Instagram and Youtube for even more chances to be a lucky winner!
(Further details are included on the WOW Embossing blog post.)

Thank you for checking out my post today, if you like what you see then don’t forget to follow/subscribe/join my mailing list so you don’t miss any of my content!

You should have got to me from Nicki Baxley.

Next up in the hop is Quyen Rabet.

The full lineup is at the bottom of this post, or head to WOW to start at the beginning!

Full Hop List:


21 May 2024

Crafty Meraki Merakiversary Giveaway Blog Hop


🎉🌟As Crafty Meraki celebrates its 4th anniversary this month, we're throwing a huge party with our brand new #Merakiversary Release! 🥳🎂  It's been an incredible journey and we're beyond grateful for your unwavering support every step of the way.  Thank you for FOUR AMAZING years of crafting adventures and your unwavering support.  Here's to many more to come! 🌟💖 #CraftyMeraki #Merakiversary #Gratitude

Discover intricate background dies that create stunning backdrops for your designs, with matching hot foil plates to add extra oomph to your projects.  Join us in commemorating this special occasion with our irresistible cupcake layering die - a delightful treat for every crafting enthusiast.  Don't miss out on the excitement of our #Merakiversary release - it's a crafting party you won't want to miss! 🎉🧁🌟

As our way of saying thank you for being part of the Crafty Meraki family, we are giving away a $100 gift certificate with each hop.  Watch all month long for hops on Instagram, YouTube and our blog with multiple chances to win amazing PRIZES! 😍  Enter by June 5th for each giveaway!  Winners will be announced on the Crafty Meraki Facebook Group.

For a chance to win a $100 gift card to Crafts Meraki, all you need to do is:
👉 Leave a comment on this blog
👉 Visit each designer's blog
👉 Comment on each designer's blog post

Full Hop List:
**Giveaway is not associated with or sponsored by Instagram or Facebook.  Giveaway accounts do not qualify.  By entering, entrants confirm they are 13+ years of age, release and agree to Crafty Meraki's terms of use.


For my card today I used the beautiful new Artisan Flora Lily Para-Dies Artisan Flora Lily Para-Dies.  This is a beautiful layering floral die set that goves you this beautiful arrangement you see above.  I diecut it from a soft pink cardstock and then did spme light ink blenidng for the flowers and leaves. 


It was added to a masked off circle where I did more ink blending using a blue distress ink.  The snetiment was stamped in black and it was all added to a soft pink A2 cardbase. A few of the Meraki Sparkle Clear Gems were added for a bit of sparkle to finish it off.

Thank you so much for stopping by and helping us to celebrate 4 amazing years of Crafty Meraki!  I hope that I have helped to inspire you today and I wish you all the most wonderful and crafty day!  

Until next time,


Custom Post Signature

Custom Post  Signature