
Is it okay if I add gold foil to everything? Hello and welcome back! Today I have yet another beautiful digital stamp to share with you all. I have discovered so many fabulous ones as of late and todays is no exception! This beautiful geometric floral is from Rachel Vass Designs and I absolutely adore it! As soon as I laid my eyes on it I knew it had to be foiled....well in all honesty what doesn't need to be foiled?! So off I went gold foil in hand!
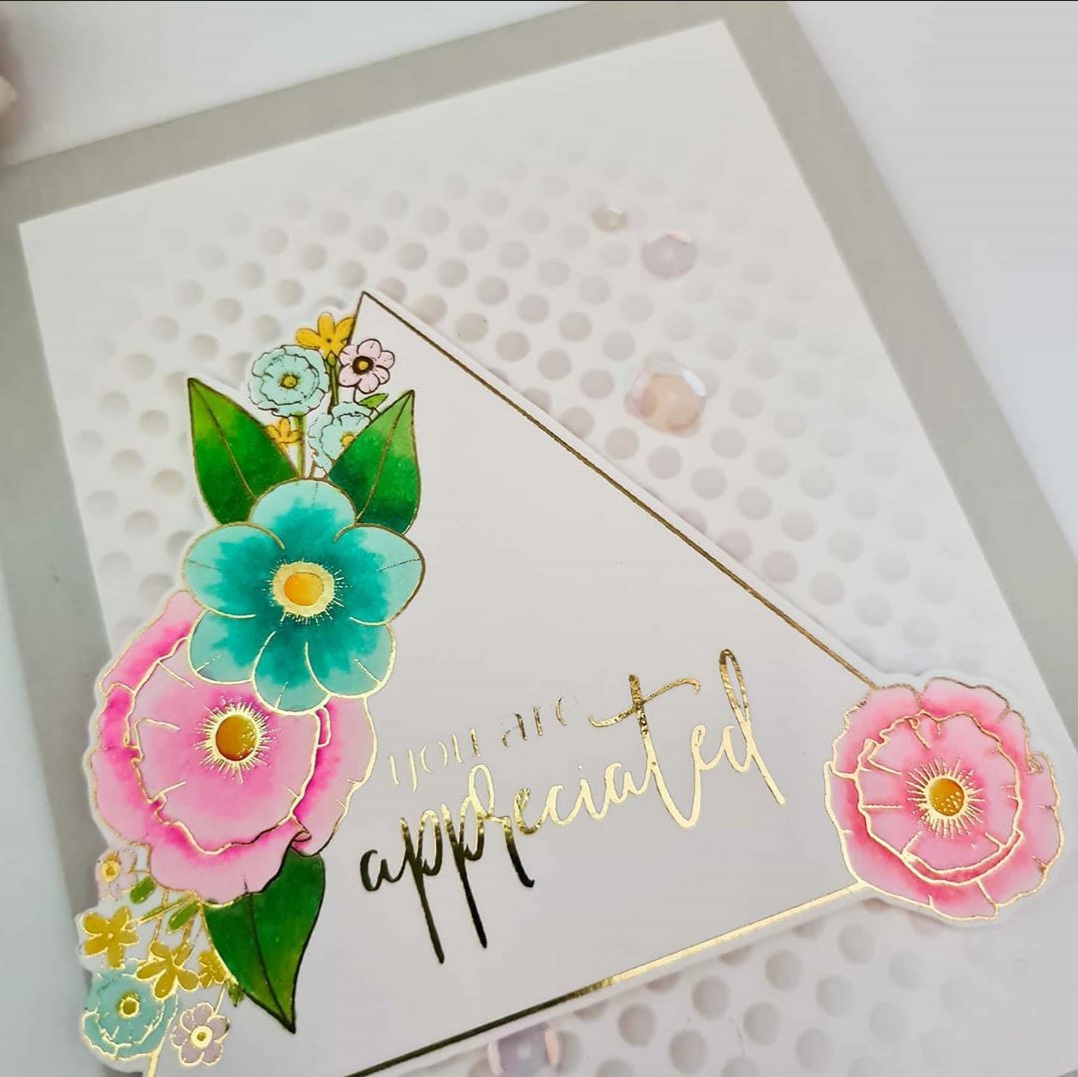
I was so happy when it came out…Oh My Goodness! Foiling and in particular gold, just makes me so incredibly happy! Adding gold foil to any project just steps it up a notch or 2....it adds a touch of elegance and makes it seem and look like it was much harder to do than it is, but that'll be our little secret...shhh. Anyways, after that I cut it out with my Brother Scan N Cut (I did say a little prayer while it was cutting that it didn't move on the mat) and I did an even bigger happy dance when it came out perfectly cut :) My next step was to trim down a piece of white cardstock to 3.5" x 4.75" and add a bit of interest to it. I grabbed some Fog ink, as that would match the card base perfectly and my Feeling Dotty stencil and started blending my ink, concentrating on where the image would be and fading out, but not going right to the edges. Every now I would grab my image and place it approx. where it was to go to make sure that I had the ink blending as I wanted it. Once that was all done I glued the stencilled piece to my Fog cardbase (same colour as my ink blending) and added some foam tape to my foiled image to pop it up from my card base. All that was needed was of course to add a wee bit more shine to it by way of some very light pink iridescent sequins. And that's it!

I was so happy when it came out…Oh My Goodness! Foiling and in particular gold, just makes me so incredibly happy! Adding gold foil to any project just steps it up a notch or 2....it adds a touch of elegance and makes it seem and look like it was much harder to do than it is, but that'll be our little secret...shhh. Anyways, after that I cut it out with my Brother Scan N Cut (I did say a little prayer while it was cutting that it didn't move on the mat) and I did an even bigger happy dance when it came out perfectly cut :) My next step was to trim down a piece of white cardstock to 3.5" x 4.75" and add a bit of interest to it. I grabbed some Fog ink, as that would match the card base perfectly and my Feeling Dotty stencil and started blending my ink, concentrating on where the image would be and fading out, but not going right to the edges. Every now I would grab my image and place it approx. where it was to go to make sure that I had the ink blending as I wanted it. Once that was all done I glued the stencilled piece to my Fog cardbase (same colour as my ink blending) and added some foam tape to my foiled image to pop it up from my card base. All that was needed was of course to add a wee bit more shine to it by way of some very light pink iridescent sequins. And that's it!
Supplies Used:
- Rachel Vass Designs Glorious Geometry Digital stamp
- Thermoweb Gold foil
- Minc Machine
- Altenew Feeling Dotty stencil
- Simon Says Stamp Fog Premium Dye ink
- Simon Says Stamp Fog cardstock
- Taylored Expressons Blending brushes
- Copic Markers - YG09, YG13, YG17, YG25, BG11, BG13, BG15, Y15, Y17, Y38, RV00, RV02, RV13, RV04 and 0 colourless blender
- Brother Scan N Cut
- Ranger Multi Medium Matte liquid adhesive
- Tonic Guillotine paper trimmer
- Little Things from Lucy's Cards Pink Iridescent sequin mix
- tweezers


.png)
Be First to Post Comment !
Post a Comment