Hey friends....welcome back! Today I am sharing with you a card full of fabulous and magical colour and an amazing butterfly, of course from the awesome
Visible Image! To make this card, it was actually pretty simple and using a technique that I love.....as it's just that easy, but it really is very effective and makes you go WOW!
To begin I grabbed the
Butterfly Ink Stencil from Visible Image and sprayed it really well on the back with a temporary spray adhesive and adhered it to a piece of watercolour paper. I tend to maybe go a bit overboard with the spray, but better to have too much and have it stick really well, then not enough and your project get ruined. I then stamped out a few of the images from the
Transmission Glitch Stamp Set using a waterproof ink, as I will be spraying it all with water. Have I said before how much I love the background grungy stamps from Visible Image??? They really are just perfect and go with any and all of their stamp sets!
Next I placed my paper with the stencil in my splat box, as this can get a bit messy lol. I picked out 3 bright and summery shades of Magical Powders and added just a wee bit of each all over using a fan brush.
I spritzed it really well with water (but not too much) and left it for a few minutes, so that way all of the colour could soak in abit. I then went in with a paper towel and dabbed off some of the excess water and powder and cleaned up the stencil abit, so I could see if any of the water and colour had seeped under the stencil. This part brings you back to the spray adhesive and why you want to make sure you spray it well, to get a good stick and to try and avoid as much water and colour creeping under it as possible. I did notice that the stamping on the upper right corner of the wing did smudge abit, even though I did use a waterproof ink, but I kind of like it like that...adds a bit more to the overall feel of it.
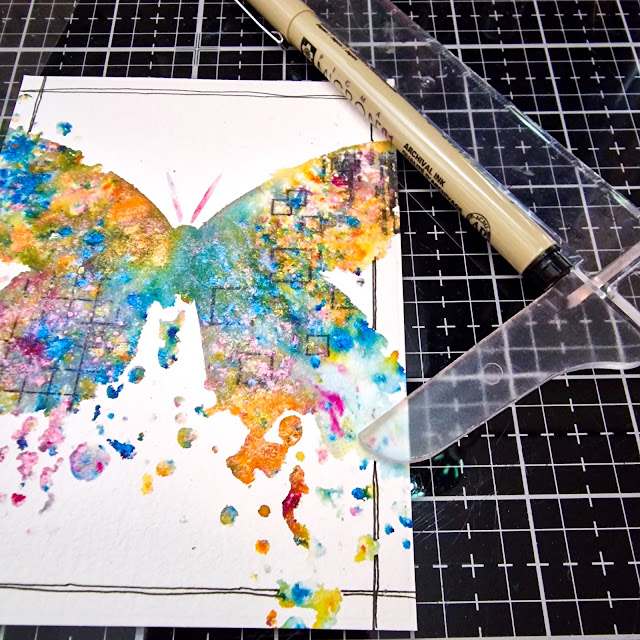
I removed the stencil and allowed it to dry fully. Once it was dry, I went over and removed any excess spray adhesive that had stuck to the paper with my finger, just by gently rubbing over it...it comes off really easily. I trimmed it down to 4"x5.25" and used my t-ruler and a black fine liner pen and went around it once to add a border. Then I went a second time adding a second line without the ruler, to make it look not so perfect.
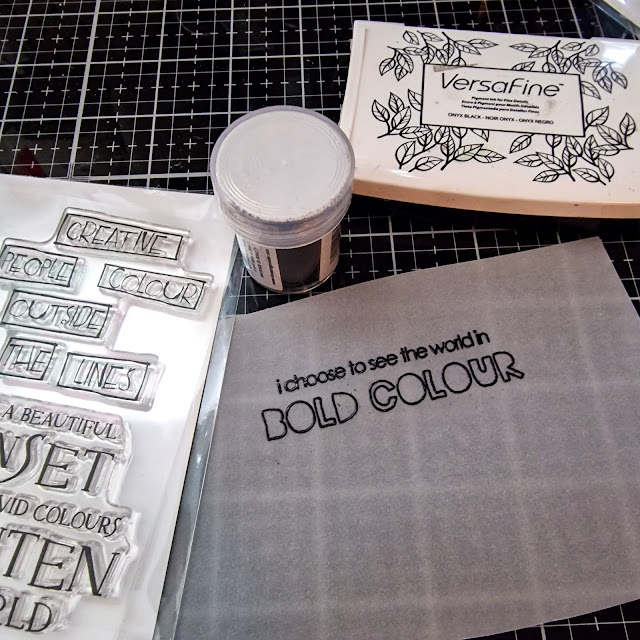
For the sentiment I used the Brighten the World Stamp Set and heat embossed it using a black embossing powder on a thin vellum. I didn't want to cover up too much of the butterfly and because this vellum is fairly thin, it worked perfect as you can see through it well, but it still shows the sentiment perfectly. Tip: when heat embossing on vellum and moreso a thin vellum, be sure to use a low heat setting on your heat tool, if it has different settings. This really helps to eliminate as much warping of the vellum from the heat as possible.....just be sure to always heat it up for a good 20-30 secs prior to taking it to the vellum.
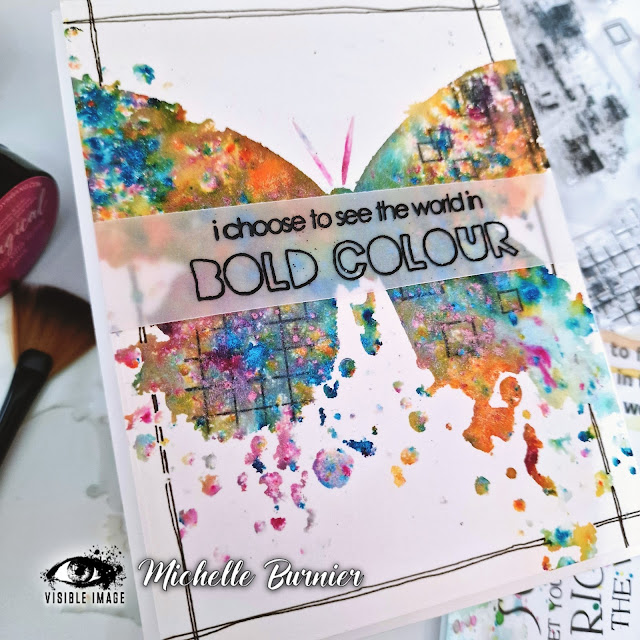
Make sure that your vellum piece is long enough on the sides, so that you can wrap it around the back of the paper to adhere it, as pretty much any adhesive on the front would show. I adhered it using some pieces of tape to the back of the cardstock. It all got added to an A2 top folding cardbase using a piece of craft foam to help to pop it up and that was it.
I absolutely love how this turned out! So much fabulous colour and this butterfly is just perfect! Who doesn't love a butterfly and even better when it has a grungy element to it! I really hope that you have enjoyed my project for today and that it helps to inspire you to get creative! Thank you so much for stopping by and I really hope that you choose to see the world in bold colour....is there any other way?!
I wish you all the most wonderful and creative day and until next time,
Supplies Used:
* Lindys Gang Magical Powders - Umbrella Drink Pink, Beach Ball Blue, Teenie Weenie Bikini
* WOW Embossing Heat Tool
* Memento Tuxedo Black Ink Pad
* WOW Primary Ebony Super Fine Detail Embossing powder
* WOW Embossing Ink Pad
* Canson XL Watercolour paper
* white cardstock
* thin velum
* t-ruler
* Pigma Micron Archival Ink Fine Liner pen 01
* temporary spray adhesive, tape
* spray bottle
* craft foam
* Nuvo Deluxe Adhesive
*


.png)
ABSOLUTELY AWESOME! Thanks for sharing
ReplyDeleteThank you very much Natasha! Your kind words are very much appreciated! Thanks for stopping by and have a great day :)
Delete